It looks like mounting files isn’t possible in the bitbucket services without getting all meta and using custom Docker-in-Docker images, so I ended up ditching the nginx service. However I successfully managed to run the PHP built in webserver!
php -S 127.0.0.1:80 public/index.php &
The -S option starts the built in dev server, and public/index.php is my app’s entrypoint. The & pushes the process into the background. It only seems to work with the 127.0.0.1 IP, if you try a custom host it won’t work.
To ensure commit messages contain the JIRA ticket, in the following format:
ABC-1234 : [your commit message here]
You can have this prepended automatically by creating `.git/hooks/prewpare-commit-msg`, with the following code:
#!/bin/sh
COMMIT_MSG_FILE=$1
branch=$(git branch --show-current)
issue=$(sed -e 's/.*\/\([A-Z]\{3\}-[0-9]\{4\}\)\/.*/\1/' <<< $branch)

if [[ $issue =~ [A-Z]{3}-[0-9]{4} ]]; then
originalText=$(cat "$COMMIT_MSG_FILE")
echo "$issue : " > "$COMMIT_MSG_FILE"
echo "$originalText" >> "$COMMIT_MSG_FILE"
fi
After creating the file, run `chmod +x .git/hooks/prepare-commit-msg` to make it executable.
You should also have a `commit-msg` hook to check with regex that the first line contains more than just the ticket [A-Z]{3}-[0-9]{4}\s:\s(.*). Exit with a non zero status if the regex fails
In my case I am using GrumPHP to manage the commit-msg hook. GrumPHP has a JIRA ticket task, which we can set up in the yaml file like so:
Send your selfsigned.crt to your iPhone via airdrop, install the profile in the Settings app.
In your Wifi settings, set Proxy to manual with your IP and port 9090.
Open Safari and browse to proxy.man/ssl, again install the profile
Finally, go into Settings > General > About > Certificate Trust Settings, and switch on Enable Full Trust for both the proxy man cert and your dev domain self signed cert.
Now you should be able to browse to https://your-dev-domain and Axios (apisauce) will not return any Network Errors. 😎
I ran composer install today, and was rather surprised to find that the intl module wasn’t installed?! Then I remembered I had installed package updates etc, and it turned out I had BOTH PHP 7.3 AND PHP 7.4 installed!
All my sites were developed on 7.3, so I had to switch back.
update-alternatives --list php
Typing that command in will output something like this:
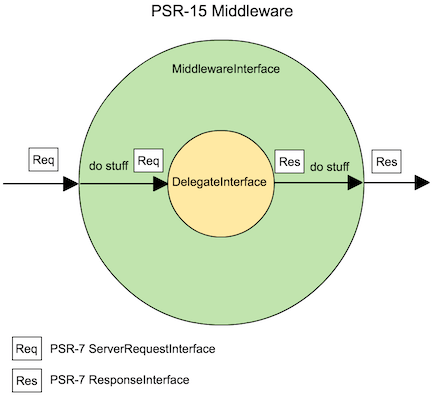
The middleware pattern is really awesome, you have layers of midlleware classes that take a request and return a reponse, but pass to a handler first, eventually reaching the original callable your request routed to.
My framework Bone MVC makes use of PSR-7 requests, so I’ve been refactoring for v3.0.0 to use league/route and it’s middleware stack, and I’ve just realised a great use case, so I’m about to refactor and create a middleware!
As well as returning the entity in array format to the JSON response, I’m also creating HAL content negotiation. I was about to do the same for the index listing the collection of entities, when i thought I could simplify my controller by taking HAL stuff out of it!
The middleware signature looks like this:
namespace Psr\Http\Server;

use Psr\Http\Message\ResponseInterface;
use Psr\Http\Message\ServerRequestInterface;

/**
 * Participant in processing a server request and response.
 *
 * An HTTP middleware component participates in processing an HTTP message:
 * by acting on the request, generating the response, or forwarding the
 * request to a subsequent middleware and possibly acting on its response.
 */
interface MiddlewareInterface
{
    /**
     * Process an incoming server request.
     *
     * Processes an incoming server request in order to produce a response.
     * If unable to produce the response itself, it may delegate to the provided
     * request handler to do so.
     */
    public function process(ServerRequestInterface $request, RequestHandlerInterface $handler): ResponseInterface;
}
So first up I’ll create my Middleware class and make it do nothing but pass stuff along as it was received
<?php

namespace Bone\Http\Middleware;

use Psr\Http\Message\ResponseInterface;
use Psr\Http\Message\ServerRequestInterface;
use Psr\Http\Server\MiddlewareInterface;
use Psr\Http\Server\RequestHandlerInterface;

class HalEntity implements MiddlewareInterface
{
    /**
     * @param ServerRequestInterface $request
     * @param RequestHandlerInterface $handler
     * @return ResponseInterface
     */
    public function process(ServerRequestInterface $request, RequestHandlerInterface $handler): ResponseInterface
    {
        return $handler->handle($request);
    }
}
Then register the middleware on your stack. For myself using league/router, you can add middleware to all routes, groups of routes, or individual routes, which is what I’ll do here:
A quick check, and yes, the page is still loading as per normal. So now to get the refactoring done!
First we strip out the HAL link stuff and the array merge, and move it to a class impolementing the PSR middleware interface, to make it look like this:
<?php
namespace Bone\Http\Middleware;
use Psr\Http\Message\ResponseInterface; use Psr\Http\Message\ServerRequestInterface; use Psr\Http\Server\MiddlewareInterface; use Psr\Http\Server\RequestHandlerInterface;
class HalEntity implements MiddlewareInterface { /** * @param ServerRequestInterface $request * @param RequestHandlerInterface $handler * @return ResponseInterface */ public function process(ServerRequestInterface $request, RequestHandlerInterface $handler): ResponseInterface { $uri = $request->getUri();
vX.Y.Z – Major.minor.patch – or, BC breaks, features, hotfixes! The best software would be 1.∞.x, as that would mean an absolute tonne of new features have been added, without breaking any backwards compatibility!
Having said all of that, I would now like to present my latest BC break, and announce the release of Bone MVC Framework v3.0 😀
What’s new? Quite a lot. Try it out! We (I) ripped out the old Bone Router and replaced it with league/route, a PSR-15 middleware router based on Fastroute! We replaced Pimple with delboy1978uk/barnacle, a PSR-11 wrapper for Pimple (Pimple has a PSR-11 wrapper but it doesn’t implement the interface correctly and so doesn’t work. Fabien Potencier has went in a huff with the PHP-Fig group so I didn’t bother sending him a Pull Request 😐). Both of these improvements have allowed for a far more flexible and modular approach to site building, as you will see if you try it out!
Ok then, let’s see it in action
The recommended approach is to use Docker, as this means you can get the identical dev enironment that I do, regardless of your operating system. If you don’t wish to take this approach, you can set a virtualhost and database yourself.
Docker VM dev environment setup
To get the Docker VM working, make sure you have Git, VirtualBox (or VMWare), and Docker installed. Once you do, open a terminal window. We need to run a one off command, telling Docker to create a VirtualBox VM which will be your new Docker Machine.
docker-machine create --driver virtualbox default
You now have a Docker Machine. So, the usual process when you would like to begin coding ais as follows:
docker-machine start
Now it’s started, run this for every tab you open in the terminal to set up environment vars in your terminal
eval $(docker-machine env)
Installing Bone MVC Framework
By default, we use a fake domain https://awesome.scot, so sudo nano /etc/hosts and add the following:
awesome.scot 192.168.99.100
Now if you cd into wherever you wish to store the project (~/Sites in my case), we can clone the framework skeleton project:
git clone https://github.com/delboy1978uk/bonemvc
cd bonemvc
Inside the skeleton files, you’ll see a docker-compose.yml, and a build folder. If your’e nosey, have a look and you’ll see how it works! The VM comes with Apache, PHP 7.3, XDebug and a stack of PHP modules, Composer, Mariadb, Mailhog, self signed SSL certificate, and most of the stuff you need. Lets start it up.
docker-compose up
This will take a few minutes the first time you do this, but thereafter should be a lot faster, even with different Bone MVC projects in different folders.
At this point, your terminal is now tailing the logs from each of your services, mail, php, apache, mariadb, and so we need another tab open as we want to log into to the Linux VM to run composer. Remember when you open a new tab, you need to run the eval command again to get the environment variables.
At this point, you’ll notice a slight change in your shell’s look. We are now logged into the server! Lets install the dependencies and we are ready to rock!
Once composer is finished doing it’s thing, we are ready to browse to the project! Open https://awesome.scot in your browser, and you should see the following!
Okay great, so how is it all structured?
As per most projects these days, the main entrypoint is public/index.php, and all public assets are installed in public/. Bone use the environment variable APPLICATION_ENV to differentiate between your dev setup and staging, production, etc.
The build folder is part of the Docker setup as mentioned earlier, so can be ignored.
The config folder allows for subfolders based on the APPLICATION_ENV, which will override the config files sitting directly under config/. You can add as many .php files into these folders that you like.
The data folder containsa variety of things. There is a cache storage folder (delboy/bone-cache coming soon), a logs folder (delboy1978uk/bone-log coming soon), a proxies folder (for doctrine entity proxies if using delboy1978uk/bone-doctrine), a translations folder with several languages pre-configured (use poedit to edit these files), and an uploads folder.
The migrations folder is use to store database migrations if using delboy1978uk/bone-doctrine.
The src/ folder contains your applications modules, and currently only contains one module, App.
Inside src/App, you will see a class called AppPackage.php, look inside!
All packages implement RegistrationInterface, and any packages containing controller routes will also implement RouterConfigInterface. addToContainer() allows you to create object factories so you can inject any dependencies. In the AppPackage, the Controller requires the view engine so it can render pages, so we create a controller factory and pull the view from the container (view is set up automatically by Bone):
    /**
     * @param Container $c
     */
    public function addToContainer(Container $c)
    {
        $c[IndexController::class] = $c->factory(function (Container $c) {
            $view = $c->get(PlatesEngine::class);
            return new IndexController($view);
        });
    }
The addRoutes() method tells the router which actions in which controller to call.
If you have Doctrine entities, return true in the hasEntityPath() method, and return the path to the Entity folder in the getEntityPath() method.
Controllers now just take in a PSR-7 request, and return a PSR-7 Response. However we can wrap the request and response in middleware! See league/route docs for more info.
For a bit of fun, I’ll show you a module with a Doctrine entity, and just how quickly you can add a new feature! In the VM CLI, type the following:
You now have the doctrine and my test entity package in the vendor folder.
Open config/packages.php, and add the two packages.
<?php

use BoneMvc\Module\App\AppPackage;
use BoneMvc\Module\BoneMvcDoctrine\BoneMvcDoctrinePackage;
use Random\Developer\JediPackage;

return [
    'packages' => [
        AppPackage::class,
        BoneMvcDoctrinePackage::class,
        JediPackage::class,
    ],
    'viewFolder' => 'src/App/View'
];
Ok, so we have entities need migrated to the database. In the VM CLI, type the following:
migrant diff
migrant migrate
You’ll notice that migrant is just Doctrine migrations, but tweaked for usage with Bone MVC. Now you have migrated, head over to https://awesome.scot/jedi
You now have a demo module with an index list page, add edit and delete functionality, with form filtering and validation and rendering done via delboy1978uk/form. Have a look through the module code to see how to set everything up!
Please play around and have fun with it, and feel free to leave any comments!
You should run eval $(docker-machine env) in any other terminal tabs you open too, this sets up environment vars for setting up docker. Take a note of that IP address, and edit your /etc/hosts file
192.168.99.100 awesome.scot
Ok, lets clone the LAMP stack:
git clone https://github.com/delboy1978uk/lamp
cd lamp
And I don’t mean change the vendor folder name, that’s easy. I mean getting one package in a custom location, whereas the rest still go into vendor.
This will only work with packages that require composer/installers, so if it isn’t your own package and they don’t require that in, then you can stop reading.
Still here? Awesome. In your vendor package, you need to add the installer
composer require composer/installers
Now in your composer.json, change (or add) the type. The package we just required in is actually to help various CMS’es and frameworks, so you must supply a valid type. Thankfully, it doesn’t matter which we choose, as we override the install path anyway.
"type": "ppi-module",
Commit that, and then go to your main project. In the composer.json, add the following:
I absolutely love XDebug, it’s a tool that no PHP developer should go without! I constantly find myself in contracts where the workplace aren’t using it, and I end up installing and configuring it for them. However, using XDebug alone will only allow one connection at a time. This is fine when we are are developing in an isolated environment, but in many offices an entire team of developers could be working on a server at once! The solution to this is to add an XDebug proxy!
I will assume for this tutorial that you already have XDebug working and can connect with one user.
Now, before you click on the PHP download, DON’T. You actually want the Python one. Download the package for your OS. If you use Linux or Mac, you’ll need python installed too. Windows comes with a binary .exe so Python isn’t required.
Depending whether you are using PHP-FPM or not will determine which port XDebug is currently listening on. PHP-FPM itself runs on port 9000, so if you are using that, your XDebug port will probably be 9001. If you are using PHP as an apache module or whatever, XDebug will probably be listening on port 9000. For the purposes of this article I will assume XDebug is listening on port 9000.
-d is the debugger itself, listening on port 9000 on the same machine
-i is the IDE listener port. The IP itself is actually the external IP of this same machine.
If it’s running, you should see something like this:
proxy> .\pydbgpproxy.exe -d 127.0.0.1:9000 -i 10.227.148.40:9001
 INFO: dbgp.proxy: starting proxy listeners.  appid: 8080
 INFO: dbgp.proxy:     dbgp listener on 127.0.0.1:9000
 INFO: dbgp.proxy:     IDE listener on  10.227.148.40:9001
Now back in PHPStorm (or some inferior product) Goto the DBGp Proxy settings in the tools menu, and select configure. Put your name in the IDE key box, the IP of the PHP server, and port 9001.
Again in the tool DBGp proxy, and click Register IDE. If successful, you should be able to see lines like this: